


AirDrop is an integral part of the Apple ecosystem. Users can send large files from iPhone/iPad to Mac and vice versa with one click. There is no need to use cables, cloud storage, or third-party services like Xender or Airdrop to send files and media. But what if things go south? Airdrop not working on Mac can be a headache as you don’t want to mess with a lightning cable to get things done.

AirDrop uses Bluetooth 4.x for power-efficient broadcasting and discovery, and peer-to-peer WiFi for fast transfer. If you have problems transferring files from Mac using AirDrop, refer to solutions to fix the problem.
1. Check Device Compatibility
To successfully use AirDrop, your Mac must be running OS X Yosemite or later. You can find out which version of macOS your Mac is running by going to Apple menu > About This Mac. As for updates, go to Apple menu > System Preferences > Software Update.
Also, the device you are trying to transfer files to must be an AirDrop compatible device.
When transferring files from Mac to iPhone, your iPhone must be an iPhone 5 or later running iOS 7 or later of the iOS software.
If you are trying to AirDrop from Mac to iPad or iPod, iPad must be iPad 4 or later and iPod must be 5th generation or newer.
2. Adjust AirDrop Settings on iPhone
Apple provides several sharing options to securely use AirDrop functionality between devices. You need to check your iPhone to make sure the device can receive files from Anyone or Contacts via AirDrop. Follow the steps below to make the changes.
Stage 1: Open the Settings app on iPhone.
Step 2: Go to General > AirDrop.
Stage 3: Select Contacts Only or Everyone from the menu below.


Alternatively, you can swipe down from the top-right corner (or the bottom of the iPhone if you’re using an older model with a power button) and open the Control Center.

Long press the connection menu and enable the AirDrop option.
3. Check WiFi and Bluetooth
AirDrop relies on Bluetooth to find nearby devices and WiFi to effortlessly transfer files. So make sure that Bluetooth and WiFi are enabled on the sending Mac device.
To enable the service, go to the Mac menu bar and click the Bluetooth icon. Similarly, follow the same routine for WiFi.

You can also open Finder menu > AirDrop; this will show which connections are disabled on Mac. You can also enable them from the said menu.

The receiving device must have at least Bluetooth enabled. Also, just make sure the AirDrop toggle is turned on for the device with the corresponding permission.
4. Allow Anyone to AirDrop from Mac
You can be totally fine with the Contacts Only AirDrop option on Mac. But sometimes, it may cause failure to send files from Mac to iPhone.
So, follow the steps below to change the Sharing permission to Everyone in the AirDrop menu.
Stage 1: On Mac, open the Finder menu.
Step 2: Click on AirDrop in the left pane. In the right pane, click Allow me to be discovered and select Everyone from the drop-down menu.

Let me remind you once again to enable the Allow Everyone option on the device you are transferring the files to.
5. Sign in to iCloud on Both Devices
For security reasons, we recommend using Contacts Only in AirDrop on both Mac and iPhone. To do this, make sure that both the sending and receiving devices are signed into iCloud.
The email ID or mobile number associated with iCloud must be present in the contacts list on both devices.
6. Disable Do Not Disturb Mode on Mac
If Do Not Disturb mode is enabled on your Mac, you cannot send files using the AirDrop function.
Move the mouse pointer to the macOS menu bar and open Control Center. Disable DND mode from the drop-down menu.

Alternatively, you can disable DND from the System Preferences > Notifications menu.
Similarly, make sure the device you are transferring files to is not in Do Not Disturb Mode.
7. Prevent Mac from Sleeping
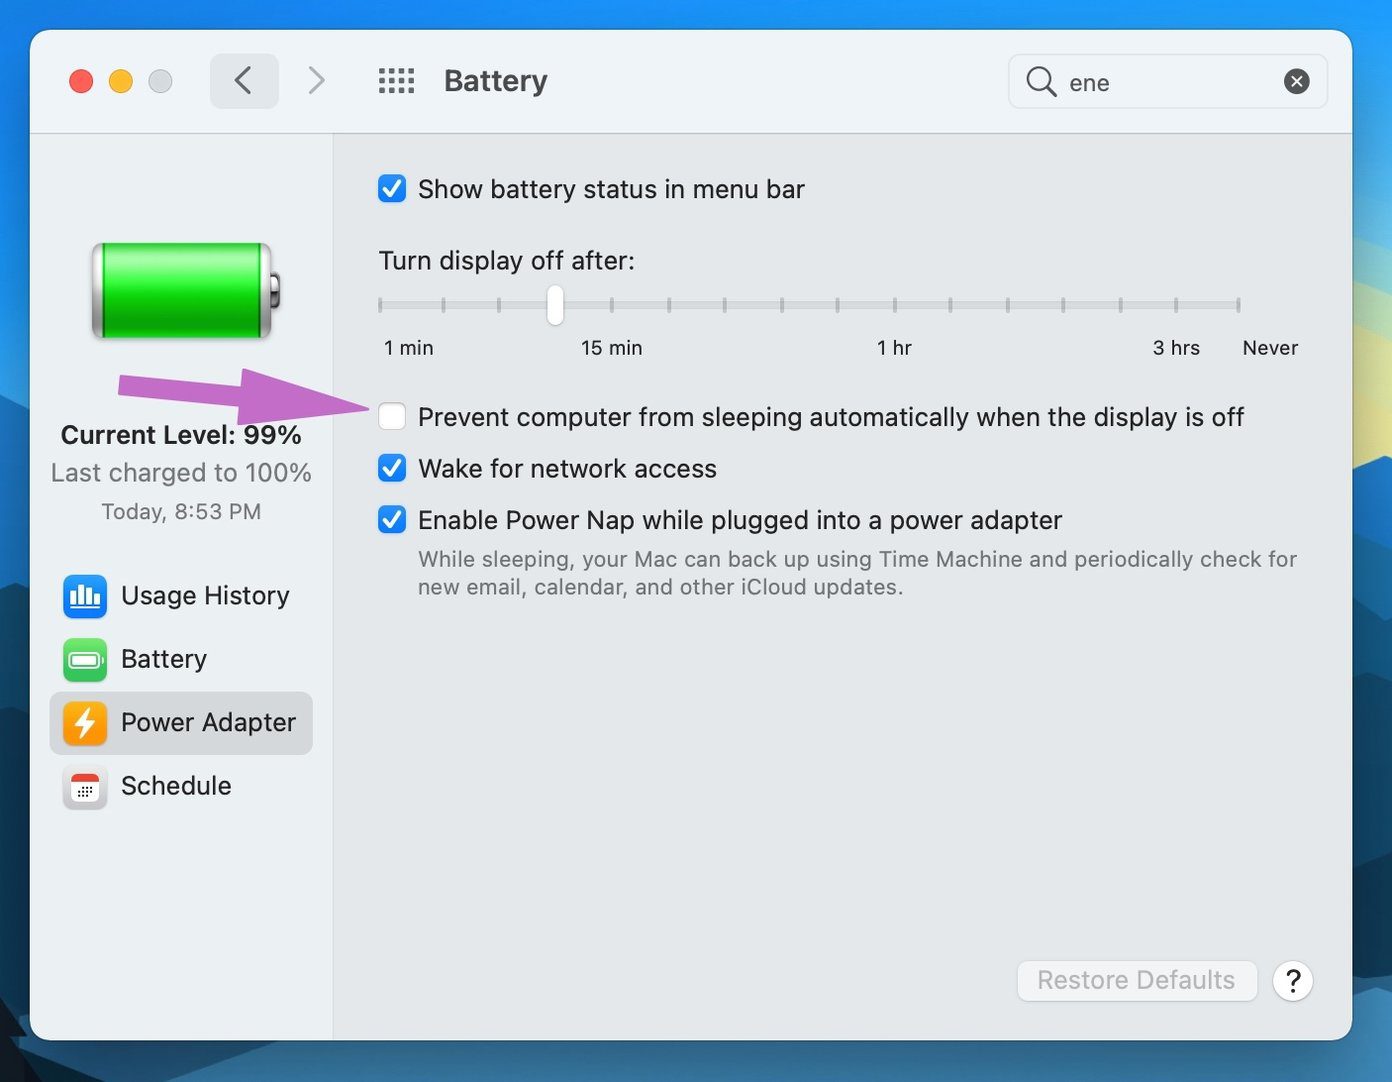
Transferring large files over AirDrop takes time. AirDrop may fail if your Mac goes to sleep during the file transfer process. To change the behavior, follow the steps below.
Stage 1: On Mac, open the System Preferences menu.
Step 2: Go to the Battery > Power Adapter menu.
Stage 3: Enable ‘Prevent computer from sleeping automatically when screen is off’.
Start Sharing Files Via AirDrop
Transferring files to your different Apple devices using AirDrop is part of what makes combining Mac and iPhone/iPad so painless. Follow the above steps and fix AirDrop related issues on Mac. Share which trick worked for you in the comments below.
Next: Having screen flickering problem on MacBook? Read the post below to learn how to fix the problem.
Support our work ❤️
If you enjoyed this article, consider leaving a tip to help us keep publishing great content.
